Breakfast

Fluffy Plain Buttermilk Pancake

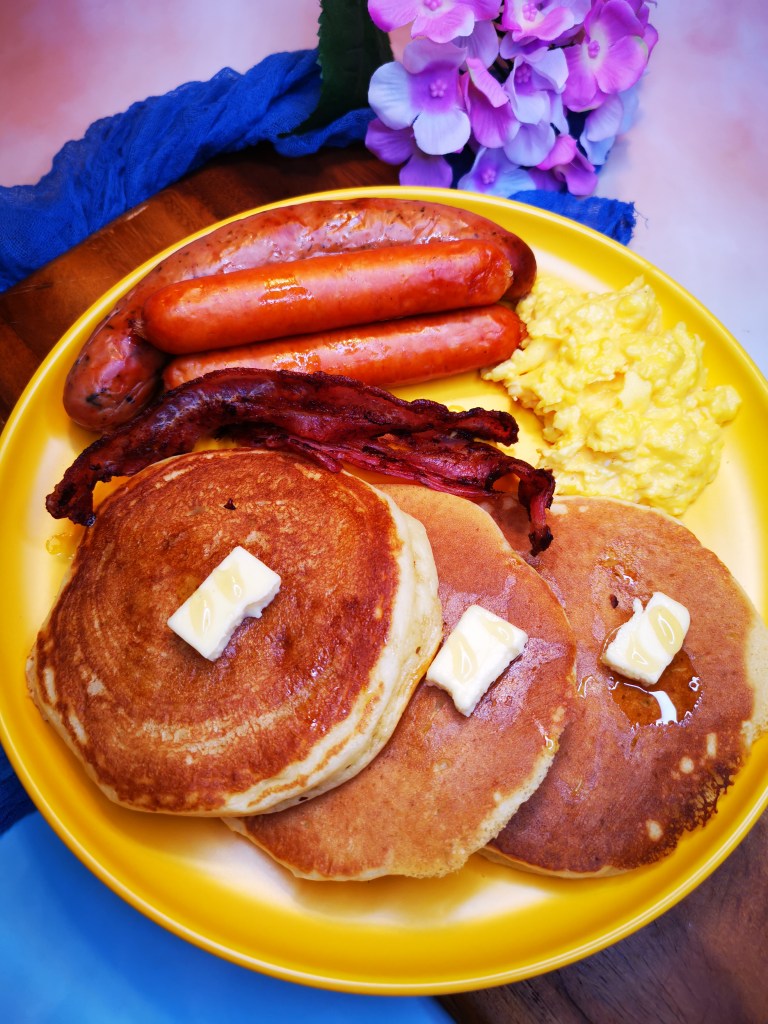
Sundays are usually brunch day in my household. Waking up a little later than the usual, I would take it slow and easy, playing vinyl records in the background while I prepare a big delicious breakfast for my family. Truly, a relaxing morning! One of the things that I would prepare is my family’s all time favourite – plain buttermilk pancakes. They are fluffy and delicious and would make a great brunch for everyone.

Ingredients

  • 200g All Purpose Flour
  • 35g White Sugar
  • 6g Baking Soda
  • * 7g Double Acting Baking Powder (See note Below)
  • 1g Salt
  • 40g Cooking Oil
  • 64g eggs
  • * 300g Buttermilk

Note * Use double action baking powder because this will help make your pancake thick and fluffy as compared to single action. Why? Because more chemical reactions happen when cooking with double action baking powder as compared to its single action counter part. Single acting baking powder chemical reactions occur mostly when in contact with liquid. As a home cook, you won’t be able to cook all your batter quickly using a pan, hence it is better and easier to maintain the fluffiness throughout your cooking when you use double acting.

As for the buttermilk, it helps create a thicker batter than regular milk. This will also help make your batter more vicious, preventing it from spreading out easily. On top of that, it gives additional flavour to your pancake.

Method

  • Add all the dry ingredients together, give it a few whisks.
  • Add in all the wet ingredients such as eggs, buttermilk and oil into the dry ingredients. Whisk until batter becomes smooth.
  • Heat up your non-stick pan at medium low heat.
  • Pour some batter onto your pan, forming about 5-6 inches diameter circles.
  • Flip when the edges appear to be harden.
  • Cook the other side for the same amount of time, until light brown
  • Do the same thing for the rest of the batter
  • Serve with butter and syrup of your choice

Single Proofed Pillowy Soft Milk Bread

The picture above says it all, the bread is so soft that you just can’t get enough of it. I am sure that you would not stop for just one slice. As I am constantly trying and experimenting on new recipes, I decided to try making a pillow soft bread with just one single proof and not using tangzhong method; it turned out pretty well. Everybody loves it that I have to bake it for a couple of times in one week.

Ingredients

  • 300g bread flour
  • 3g instant active yeast
  • 30g sugar
  • 40g whipping cream
  • 30g well beaten egg
  • 150g full cream milk
  • 20g butter (cut into small pieces)
  • 3g salt

Non- Stick Bread loaf Pan (19.5×10.3×11.3cm)

Method

  • Preheat the oven at 180 degree celsius
  • Mix all the wet ingredients together (cream, full cream milk, beaten egg) then set aside
  • Add all bread flour, yeast, and sugar into the mixer followed by the wet ingredients
  • Use the J hook to knead the dough at low speed. Knead until dough is formed
  • Add in the butter and knead for about 2 minutes at speed 2 ( low speed)
  • Add in the salt and continue to knead at speed 2. Knead until you reach window pane stage. This will take for about 15-17 minutes depending on your machine. I am using Kenwood ChefXL titanium. The window pane stage is essential to get the long strand like texture that you can see from the photo. (拉丝)
  • Divide the dough into 3 equal balls , flatten it into rectangular and roll it up like a swiss roll. Cover with plastic and let it rest for 15 minutes
  • Lightly flour your work surface, use a rolling pin to flatten it into rectangular shape with the width size that fits in in your bread box. Ensure that all air pockets are popped to get a fine crumb and prevent uneven air pocket on the finished product. Flip the dough and roll it up tightly like a swiss roll. Put it into the bread box. Do the same to the other dough. ( Refer to pictures below)
  • Cover and let it proof for about an hour and half or until the dough reaches to 90-95 percent height of the bread box
  • Brush the top with egg wash (1 beaten egg + 1 tbs water)
  • Bake for 30-35 minutes. Tent the top of the bread with foil after 15 minutes to prevent it from getting too dark.
  • Remove from the bread box and let it cool down on the wire rack. Brush the top with melted butter. Brushing it with melted butter will result in a soft crust. Let it completely cool down for about an hour and half to 2 hours before slicing.

note: if you glass dish to bake, you will need to adjust the temperature to higher or longer time to bake. As glass is not a heat conductor like metal box. Another thing to take not is if you use baking dish, that are low in height , then 90-95 percent proofing height is no longer applicable. What you need to see is at least double in height increase during proofing. Do note that the time of proofing is just a guideline, as there are other factors that would affect the proofing time, it can be the temperature, humidity or even the yeast. 😊

1 7 8 9 11